EmailTheInternet.com: Sending and Receiving Email in Windows Azure
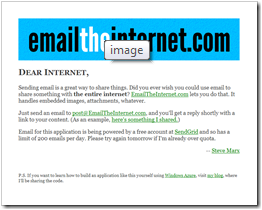
This sample, which you can download here, does three things of technical interest:
- It uses a third party service (SendGrid) to send email from inside Windows Azure.
- It uses a worker role with an input endpoint to listen for SMTP traffic on port 25.
- It uses a custom domain name on a CDN endpoint to cache blobs.
Background: email and Windows Azure
Sending email is more complicated than you might think. Jeff Atwood has a blog post called “So You’d Like to Send Some Email (Through Code)” that sums up some of the complexities.
Sending email directly from a cloud like Windows Azure presents further challenges, because you don’t have a dedicated IP address, and it’s quite likely that spammers will use Windows Azure (if they haven’t already) to send truckloads of spam. Once that happens, spam blacklists will quickly flag the IP range of Windows Azure data centers as sources of spam. That means your legitimate email will stop getting through.
The best solution to these challenges is to not send email dircetly from Windows Azure. Instead, relay all email through a third-party SMTP service (like SendGrid or AuthSMTP) with strict anti-spam rules and perhaps dedicated IP addresses.
Note that receiving email is a completely different story. As long as people are willing to send email to your domain, you can receive it in Windows Azure by just listening on port 25 for SMTP traffic.
Sending email using a third-party service
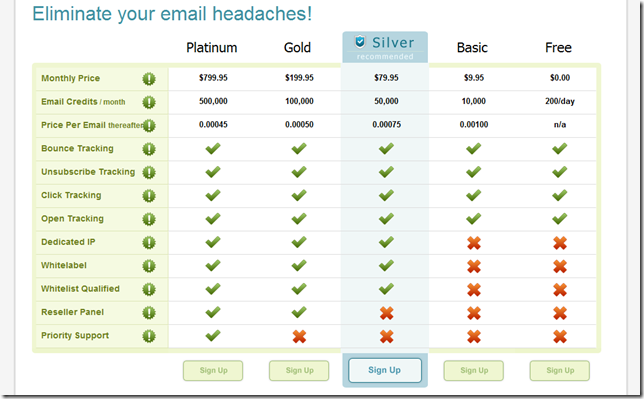
The first thing I did was sign up for a free account with SendGrid. The free tier allows me to send up to 200 emails per day, but it doesn’t give me access to some of the advanced features. I’d recommend using at least the Silver tier if you’re serious about your email being delivered and looking correct for all users.
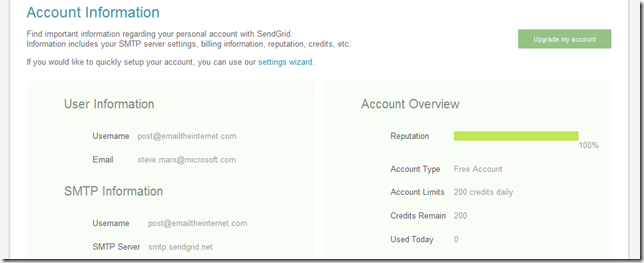
Once I completed the quick signup, I took down all the details, which I added as configuration settings to my project:
Actually sending email is incredibly easy using the System.Net.Mail namespace. Here’s the code that sends email replies for EmailTheInternet.com:
var reply = new MailMessage(RoleEnvironment.GetConfigurationSettingValue("EmailAddress"),
    msg.FromAddress)
{
    Subject = msg.Subject.StartsWith("RE:", StringComparison.InvariantCultureIgnoreCase)
                                            ? msg.Subject : string.Format("RE: " + msg.Subject),
    Body = body,
    IsBodyHtml = msg.HasHtmlBody // send HTML if we got HTML
};
if (!reply.IsBodyHtml) reply.BodyEncoding = Encoding.UTF8;
// make it a proper reply
reply.Headers["References"] = msg.MessageID;
reply.Headers["In-Reply-To"] = msg.MessageID;
// use our SMTP server, port, username, and password to send the mail
(new SmtpClient(RoleEnvironment.GetConfigurationSettingValue("SmtpServer"),
    int.Parse(RoleEnvironment.GetConfigurationSettingValue("SmtpPort")))
{
    Credentials = new NetworkCredential(RoleEnvironment.GetConfigurationSettingValue("SmtpUsername"),
        RoleEnvironment.GetConfigurationSettingValue("SmtpPassword"))
}).Send(reply);
Yes, it’s really that easy. If you take a look at the code, you’ll see that there’s much more work involved in constructing the HTML body of the email than in sending it via SMTP.
Note that for EmailTheInternet.com, I’m using SendGrid’s free pricing tier, which means I get a limited number of emails per day, and I don’t get a dedicated IP address or whitelabeling. Because of this, my emails may not all make it through spam filters, and some email clients will show the emails as coming from sendgrid “on behalf of post@emailtheinternet.com.” This is simply because I haven’t paid for those services, not because of some limitation of this approach.
Receiving email using a worker role
I was surprised how hard it was to find good, free libraries for receiving email in C#. I settled on Eric Daugherty’s C# Email Server (CSES) to receive the email, and then I added SharpMimeTools to handle the complex task of decoding MIME emails with attachments.
You can read the code for the gory details, but I essentially do two things:
- Start a
TcpListenerinOnStart()to listen on the appropriate port. - Start a loop in
Run()that handles each incoming email by saving everything to blobs and replying via email.
Here’s the code that initializes our SMTP handler (part of CSES) and starts a TcpListener listening on the right port (called from OnStart()):
listener = new TcpListener(IPAddress.Any,
    RoleEnvironment.CurrentRoleInstance.InstanceEndpoints["SmtpIn"].IPEndpoint.Port);
processor = new SMTPProcessor(RoleEnvironment.GetConfigurationSettingValue("DomainName"),
    new RecipientFilter(), new MessageSpool());
listener.Start();
Note that I’m using the service runtime API to determine the correct port.
Here’s the simple asynchronous handling of incoming TCP connections (called from Run()):
var mutex = new ManualResetEvent(false);
while (true)
{
    mutex.Reset();
    listener.BeginAcceptSocket((ar) =>
        {
            mutex.Set();
            processor.ProcessConnection(listener.EndAcceptSocket(ar));
        }, null);
    mutex.WaitOne();
}
Finally, here’s the code that handles an incoming email:
// make a container, with public access to blobs
var id = Guid.NewGuid().ToString().Replace("-", null);
var container = account.CreateCloudBlobClient().GetContainerReference(id);
container.Create();
container.SetPermissions(new BlobContainerPermissions() { PublicAccess=BlobContainerPublicAccessType.Blob });

// parse the message
var msg = new SharpMessage(new MemoryStream(Encoding.ASCII.GetBytes(message.Data)),
    SharpDecodeOptions.AllowAttachments | SharpDecodeOptions.AllowHtml | SharpDecodeOptions.DecodeTnef);

// create a permalink-style name for the blob
var permalink = Regex.Replace(Regex.Replace(msg.Subject.ToLower(), @"[^a-z0-9]", "-"), "--+", "-").Trim('-');
if (string.IsNullOrEmpty(permalink))
{
    // in case there's no subject
    permalink = "message";
}
var bodyBlob = container.GetBlobReference(permalink);
// set the CDN to cache the object for 2 hours
bodyBlob.Properties.CacheControl = "max-age=7200";

// replaces references to attachments with the URL of where we'll put them
msg.SetUrlBase(Utility.GetCdnUrlForUri(bodyBlob.Uri) + "/[Name]");

// save each attachment in a blob, setting the appropriate content type
foreach (SharpAttachment attachment in msg.Attachments)
{
    var blob = container.GetBlobReference(permalink + "/" + attachment.Name);
    blob.Properties.ContentType = attachment.MimeTopLevelMediaType + "/" + attachment.MimeMediaSubType;
    blob.Properties.CacheControl = "max-age=7200";
    attachment.Stream.Position = 0;
    blob.UploadFromStream(attachment.Stream);
}
// add the footer and save the body to the blob
SaveBody(msg, bodyBlob, message, container, permalink);
From there, it’s just a matter of sending the reply, which we’ve already seen.
Custom domains and CDN
Using a custom domain name is a must for your email-enabled application if you want to take advantage of email verification mechanisms like SendGrid’s whitelabel features (including Domain Keys). This is because those features require that you’re able to change DNS settings for your domain. I’m not taking advantage of those features, but I decided to use a custom domain name anyway.
I’ve covered the Windows Azure CDN before, but I thought it’s worth going over again. The Windows Azure CDN is perfect for an application where this, where (in my imagination) things that get published this way will potentially be viewed by many people around the world. I decided to turn on the CDN for this demo’s blob storage account. I also decided to use custom domain names for the CDN endpoint (http://content.emailtheinternet.com).
Step 1: Set up the CNAME record for EmailTheInternet.com
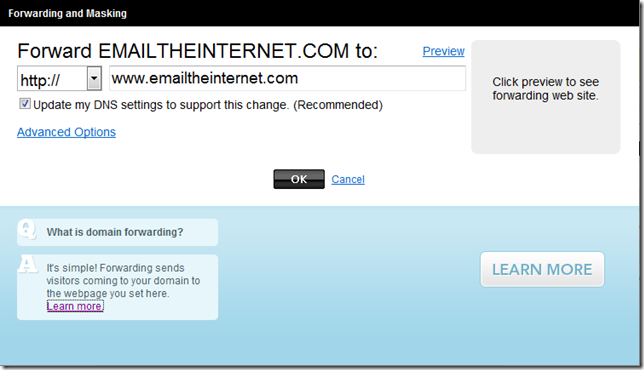
Setting up a custom domain with a Windows Azure application is easy. I just went to my domain registrar (GoDaddy) and set up domain forwarding from emailtheinternet.com to www.emailtheinternet.com:
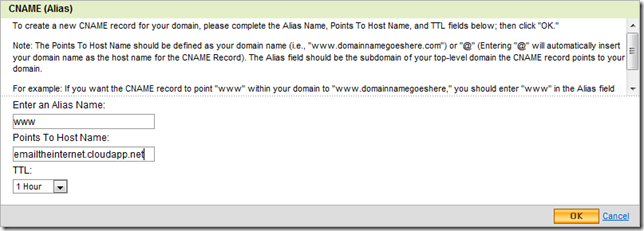
Then I added a CNAME record that maps “www” to emailtheinternet.cloudapp.net (the domain I got from Windows Azure):
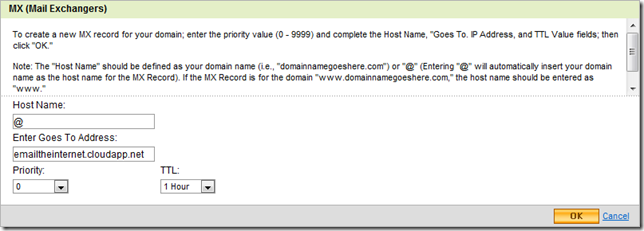
Finally, because I want email to get routed correctly, I needed to add an MX record also maping to emailtheinternet.cloudapp.net:
Step 2: Enable the CDN for my storage account
Adding a CDN endpoint to your storage account is as easy as clicking one button. Once I clicked “Enable CDN,” I got a generic CDN endpoint (az2919.vo.smecnd.net):
Step 3: Add a custom domain name for the CDN endpoint
Adding a custom domain name for a storage account or CDN endpoint consists of the same process. First I clicked “Manage” next to the CDN endpoint and entered a custom domain name:
I then clicked the “Generate Key” button, which is the first step towards validating that I own that custom domain:
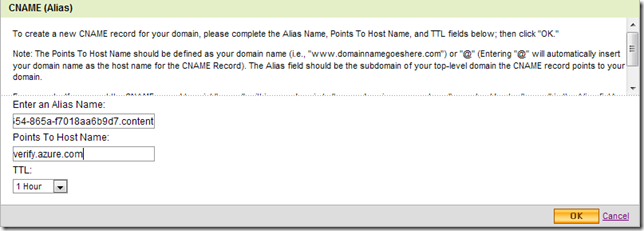
Following the instructions, I added a CNAME record mapping the generated name to verify.azure.com.
Then I want back to the portal and clicked through to validate the domain. Here’s the screen showing the custom domain name validated.
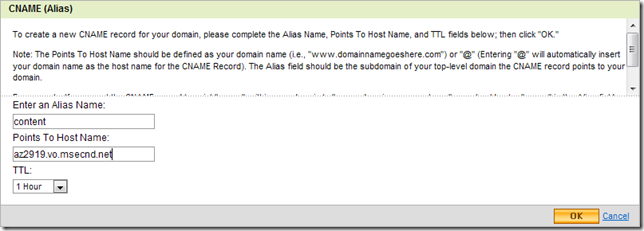
Once the domain name was validated, I went back to my domain registrar and mapped the “content” CNAME to the CDN endpoint:
The whole process took only a few minutes.
You may have noticed in the code snippets above that I’m calling a method called Utility.GetCdnUrlForUri(). This method transforms blob URIs to use the CDN host, which I store as a configuration setting:
public static string GetCdnUrlForUri(Uri uri)
{
    var builder = new UriBuilder(uri);
    builder.Host = RoleEnvironment.GetConfigurationSettingValue("CdnHostName");
    return builder.Uri.AbsoluteUri;
}
Download the code
You can download the Visual Studio 2010 solution here, but note that I have not included the dependencies. Here’s where you can download them:
Thanks, Twitter followers!
A special thanks to my followers on Twitter who helped me test this (and fix a few bugs) before I released the code here. I really appreciate the help!



 about me (Steve Marx)
