ASP.NET MVC 3 in Windows Azure
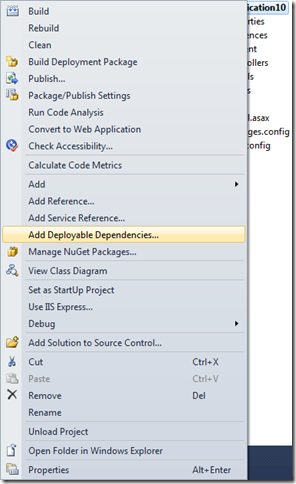
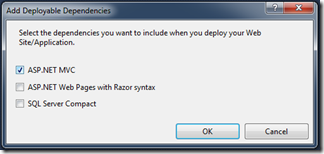
[UPDATE 7/15/2011] With the latest tools (ASP.NET MVC 3 Tools Update), Technique #1 below is even easier. The tools provide an option “Add Deployable Dependencies” that will add the appropriate binaries for you. This is probably the easiest way to make an ASP.NET MVC 3 project work as a web role. Just right-click on the MVC project and choose “Add Deployable Dependencies.” Then check the box for “ASP.NET MVC,” and you’re done!
The recently-released ASP.NET MVC 3 is awesome. I’ve been a fan of ASP.NET MVC since the first version, and it keeps getting better. The Razor syntax (which comes from the new ASP.NET Web Pages) makes me very productive, and I love the unobtrusive JavaScript. Scott Guthrie’s blog post announcing MVC 3 has a longer list of the new features. In this post, I’ll give you two options for deploying ASP.NET MVC 3 application to Windows Azure.
A bit of background
Windows Azure virtual machines don’t have ASP.NET MVC installed already, so to deploy an MVC app, you need to also deploy the necessary binaries. (This is true if you’re deploying an MVC app to any server that doesn’t have MVC already installed.) For ASP.NET MVC 2, the Windows Azure tools have a nice template (“ASP.NET MVC 2 Web Role”) that automatically sets the right assemblies to “Copy Local,” meaning they get deployed with your application. ASP.NET MVC 3 just shipped, so there isn’t yet a template in the Windows Azure tools. That means it’s up to you to include the right assemblies.
Technique #1: Include the assemblies in your application
Scott Guthrie has a blog post called “Running an ASP.NET MVC 3 app on a web server that doesn’t have ASP.NET MVC 3 installed,” which covers this technique. Specifically, there’s a link in there to a post by Drew Prog about “\bin deployment.” It lists the assemblies you should reference in your project and mark as “Copy Local.” For convenience, here’s the list from his post:
- Microsoft.Web.Infrastructure
- System.Web.Helpers
- System.Web.Mvc
- System.Web.Razor
- System.Web.WebPages
- System.Web.WebPages.Deployment
- System.Web.WebPages.Razor
Not all of these assemblies are directly referenced by your project when you create a new ASP.NET MVC 3 application. Some are indirectly used, so you’ll have to add them. Scott Hanselman also has a post about \bin deploying ASP.NET MVC 3 in which he argues that adding these as references isn’t the right thing to do:
NOTE: It's possible to just reference these assemblies directly from your application, then click properties on each one and set copyLocal=true. Then they'd get automatically copied to the bin folder. However, I have a problem with that philosophically. Your app doesn't need a reference to these assemblies. It's assemblies your app depends on. A depends on B that depends on C. Why should A manually set a dependency on C just to get better deployment? More on this, well, now.
Check out his post for his recommended approach. Both have a similar result, causing the required assemblies to be deployed in the \bin folder with your application.
Technique #2: Installing ASP.NET MVC 3 with a startup task
In my last two blog posts (“Introduction to Windows Azure Startup Tasks” and “Windows Azure Startup Tasks: Tips, Tricks, and Gotchas”), then you already know one way to do this. You can use the new WebPI Command Line tool to install MVC 3. See “Using WebPICmdline to run 32-bit installers” in my tips and tricks post to see my recommended syntax for doing this. Just change the product to “MVC3.”
The WebPI method is pretty easy, but I wanted to show an alternative in this post, which is to directly bundle the ASP.NET MVC 3 installer with your application and execute it in a startup task. This turns out to also be quite easy to do.
Step 1: Create a new Windows Azure solution and add an ASP.NET MVC 3 project to it
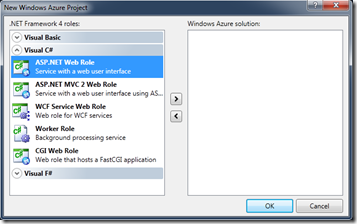
Use “File/New/Project…” to create a new Windows Azure application, but don’t add any roles to it right away (since there’s no template for ASP.NET MVC 3). In other words, just hit “OK” when you see this dialog:
Next, add an ASP.NET MVC 3 project to your solution by right-clicking on the solution and choosing “Add/New Project…” Choose an ASP.NET MVC 3 Web Application, just as you would outside of Windows Azure.
Step 2: Add the ASP.NET MVC 3 application as a web role
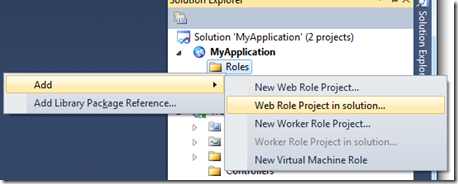
Right-click the “Roles” node under your Windows Azure project and choose “Add/Web Role Project in solution…”
Then just pick your ASP.NET MVC 3 project. Now it’s associated as a role in your Windows Azure application.
Step 3: Create a startup task
Just for aesthetics, I like to create a separate folder for any startup task that’s more than a single file. In this case, we’re going to need the ASP.NET MVC 3 installer itself as well as a batch file that will run it. (This is because we can’t pass command-line arguments in a startup task.) [UPDATE 7/15/2011] I had some bad information... you can absolutely use command-line arguments with a startup task, so I could just put the command below directly in the startup task instead of using a batch file.
Create a folder called “startup,” and put AspNetMVC3Setup.exe in it. Also add a batch file called “installmvc.cmd” (being careful to avoid the byte order mark Visual Studio will want to add, see my tips and tricks post). Put the following two lines in “installmvc.cmd”:
%~dp0AspNetMVC3Setup.exe /q /log %~dp0mvc3_install.htm
exit /b 0
Note the %~dp0, which gives you the directory of the batch file. This is important if your batch file is in a subdirectory, as the current working directory won’t be the same as the location of your startup task files. Also note the exit /b 0, which ensures this batch file always returns a success code. (For extra credit, detect whether ASP.NET MVC 3 is successfully installed and return the proper error code. What you don’t want to do is just rely on the error code of the installer, which probably returns non-success if ASP.NET MVC 3 is already installed.)
Set the batch file and the executable to both have a “build action” of “none,” and a “copy to output directory” setting of “copy always” (or “copy if newer” if you prefer). See my introduction to startup tasks post for a screenshot of what those property settings look like.
Finally, edit ServiceDefinition.csdef to call the batch file:
<WebRole name="WebRole">
  <Startup>
    <Task commandLine="startup\installmvc.cmd" executionContext="elevated" />
  </Startup>
That’s it! Now you can add whatever ASP.NET MVC 3 content you want to the web role, without having to worry about whether the right assemblies will be installed.
Download the code
You can download a full Visual Studio solution that implements the above steps here: http://cdn.blog.smarx.com/files/MVC3WebRole_source.zip


 about me (Steve Marx)
